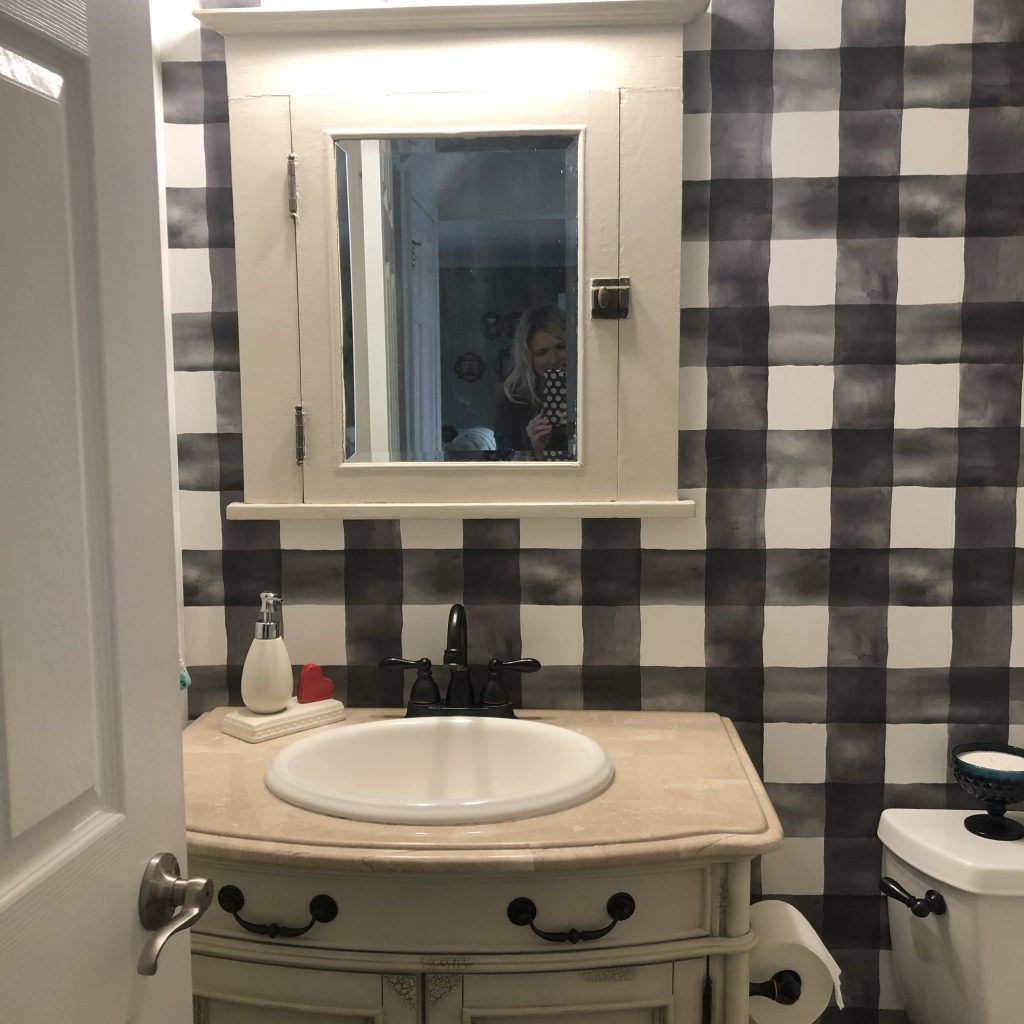
We are halfway through the week friends, woohoo! Today I’m changing things up just a tad and sharing our recent bathroom wallpaper project. It took a little convincing with the husband to let me wallpaper one wall of our half bathroom since 6 years ago we were removing wallpaper from the same bathroom. But he caved, and he even agreed to helping me with this project! Without further adieu, here is our experience with wallpapering our half bath.
Measure the space before buying wallpaper
Before purchasing your wallpaper, be sure to measure the walls in which you’re wallpapering. In our case, we were only putting wallpaper on one wall. Most wallpaper rolls will tell you how much square footage it will cover. Our space was 48 square feet but we opted for two rolls anyways because I would still like to wallpaper a small wall in our foyer (and mistakes happen). 🙂
Prep the space
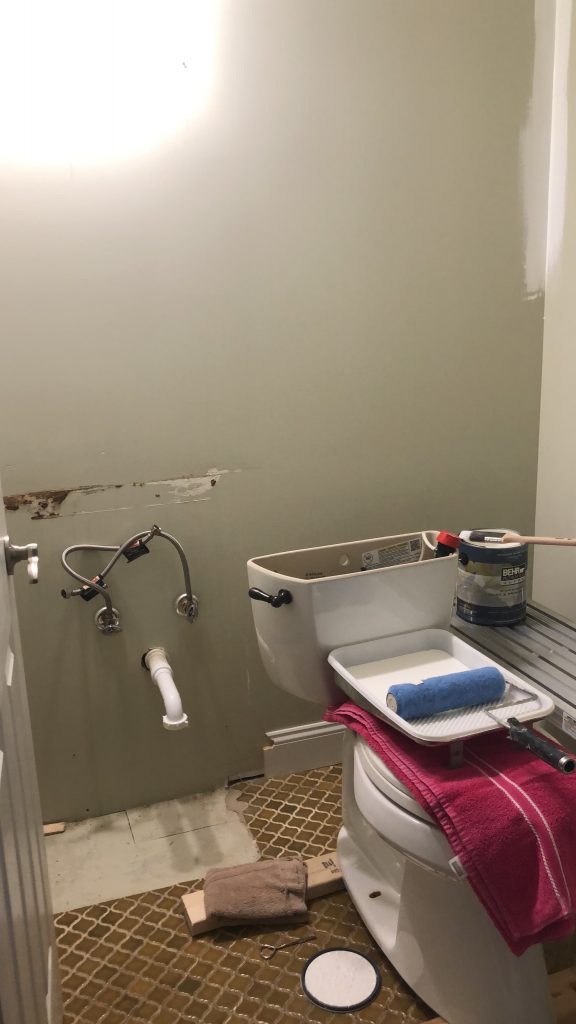
Be sure to remove any existing wallpaper (do not attempt to cover over it). In our case we chose to repaint the entire room (EXCEPT for the wall that we were wallpapering). We did wipe the wall down prior to starting the project to make sure it was clean and dry. We also moved out our vanity and toilet as those items were on the wall we were covering.
Supplies needed:
- Razor blade
- Scissors
- Spray bottle with water
- Painting tarp
- Dry wash cloths
- Straight Edge / Level
Begin the wallpaper process
We chose to use this 56 sq. ft black and white watercolor check by Magnolia Home. This particular wallpaper was 20.5″ wide for reference. The steps below are what we followed when using this particular wallpaper. If you’re using a different brand, consult those specific instructions that come with the product.
Step 1:
If possible, choose the least conspicuous corner of the room in which you are applying wallpaper (i.e. behind a door, furniture etc). You will want to measure out from the corner that you’re starting in, make a pencil mark 1″ less than the width of the wallpaper in order for the first strip to wrap 1″ into the corner. In our case, we made our mark at 19.5″. Make several marks on the wall and connect these with a straight edge. This vertical line will be where you line up your first strand. Not all walls are square, so this is a great way to ensure your wallpaper doesn’t go on crooked.
Step 2:
Roll out the wallpaper to the length of the wall that you’re covering, plus an additional 4″. This will give you 2 extra inches at the top and bottom for trimming once you have it on the wall. Cut the strip.

Step 3:
With the pattern side down (as shown in the picture above) on a flat surface begin to spray water on the back in a fine mist and pay close attention to the edges.
Step 4:
Loosely fold each end of wallpaper to the middle (hamburger style). You should avoid creasing the paper and let it sit for 3 minutes. This begins to activate the paste.
Step 5:
Carry your wallpaper strip to the wall that you plan to cover. Begin to unfold the top half of the folded strip which aligns with your vertical line that you wrote on the wall in Step 1. The paper will allow for you to reposition as necessary to get it as level with that line as possible. Start to unfold the bottom half of the strip and stick the wallpaper to the wall making sure you are placing it into and around the corner of the wall. You will have excess paper at the ceiling, at the baseboard, and in the corner. You will trim with your razor blade (this happens a little later).
Step 6:
Begin to smooth the wallpaper out using a clean towel. You will likely see air bubbles, but you should be able to work those out by working diagonally from the top of the wall down. Once you have all wrinkles and bubbles out, you can trim the excess paper with your razor blade and straight edge.
Step 7:
Now you’re ready to cut your next strip. Be sure to use the pattern to match at either the baseboard or ceiling next to the strip you already placed on the wall. Then, measure out your length from the start of the pattern (+ an additional 4″ again) and cut your piece. Repeat steps 3-6, making sure you line up the pattern right next to the strip already on the wall. Do NOT overlap the seams.
Step 8:
That’s it! Move your belongings back into the room and enjoy! Let me know if you have any questions. Happy to answer!